How to Draw & Paint a Beautiful Mermaid in Adobe Photoshop
Mermaids come in a variety of shapes, sizes, and colors. In this tutorial, we'll walk through drawing and painting a colorful mermaid in Adobe Photoshop. Video Here
We're going to both draw and paint within Adobe Photoshop, from start to finish—even the initial sketch. I assume that you have basic knowledge of Photoshop, such as creating new documents and selecting different tools within the Tools panel. You should have a basic understanding of layers, as well. Please note that this tutorial requires a drawing tablet of some kind, with pen sensitivity.
Let's get started!
Looking for Photoshop brushes, actions, and more? Why not check out GraphicRiver for awesome Photoshop add-ons.
1. How to Create the Sketch
Step 1 Coloring Here
We'll start by creating a New Document. This can be found via File and then New.There are a lot of options here (enough for an entire tutorial on its own!), but for the purpose of this tutorial, I'm going to draw at 8 inches wide by 10 inches tall. I'm also working at 300 dpi. Once you're happy with your choices, select OK.

Step 2 Coloring Here
Before we start drawing, let's make sure we've prepared our document properly. There are two important things I like to do before I begin sketching.Create a New Layer. I use layers very frequently when I'm drawing and painting in Photoshop, and you'll need them in this tutorial.
To do this, make sure your Layers panel is open. If you don't see it open by default, select Window and then Layers.
By default, you'll notice that there's only one layer here. It's called Background, and we could draw on it, if we wanted to. However, I'm going to make a new layer by clicking on the Create a New Layer icon.Video Here
This new layer is the layer I'm going to draw on. This means it will be independent of the Background Layer (where the white, background color is located).

Step 3 Coloring Here
Now, let's choose a Brush to create our sketch. There are a lot of wonderful Photoshop brushes out there that you could use, but for this tutorial, we're largely going to rely on the basic, default brushes included with the software. Note, these are just possible brush settings—there is no universally right or wrong choice, and the longer you use them, the more comfortable you will likely feel with them.However, the default settings might not look or feel the way you want them to, straight out the box. Maybe they lack the sensitivity you're more accustomed to seeing in real media like pencils or markers, for example. We'll make a few simple adjustments here that will change how they look and feel in use.
You can view your Brush Settings via Windows and then Brush.Video Here
Try toggling on the Opacity Jitter and setting it to Pen Pressure.

Try setting the Size Jitter to Pen Pressure too. Coloring Here

Step 4 Coloring Here
Now, let's start drawing! I'm going to start with a basic Hard Round Brush.Since a mermaid is both a human and a fish, I like to look at references of both, so I get a look and feel for how the body of each moves. Don't be afraid to experiment with body types, too! In this case, I'm going to give the character a full figure.
I started by blocking out basic forms to define key parts of the body, such as the ribs and hip bones. When it comes to the tail, I chose to treat it as one long, flowing appendage. I'm going to pretend that there's one long bone in there, for example.Video Here


2. How to Add the Initial Colors
Step 1 Coloring Here
Now, let's start working with colors! Personally, I like to paint on top of my lines. I start by creating a New Layer and setting the Blending Mode to Multiply. Then, I go ahead and paint on top. You'll notice that this also alters the colors of my lines, based on the color I've placed on top.Video Here
To select multiple layers, Click-Hold-Shift. Then, to merge them, Right-click, and select Merge Layers. Coloring Here

Step 2 Coloring Here
Now, let's add a basic Background Color. Choose a color via the Color Selector in the Tools panel, and then apply it to the Background Layer using the Paint Bucket Tool. If necessary, clean up any stray color around your artwork.Video Here

Step 3 Coloring Here
To block in shadows on the character, I created a New Layer on top of my current artwork layer and set it as a Clipping Mask. Video HereThis means I can paint on top of it without going outside the boundaries of my work. To do so, select your newly created layer, right click on a PC or Control click on a Mac, and then select Clipping Mask.
Here is what a Layer with a Clipping Mask applied looks like. Note that I've also set the Blending Mode to Multiply.Video Here

3. How to Paint the Mermaid
Step 1 Coloring Here
Now that we've established the basics of our drawing, we can start refining our work. This is the point where I often experiment with other brushes. For example, when rendering skin, I often use a brush with a softer edge. I used the default Soft Round Brush for this tutorial, with the same settings reviewed earlier, to make the shadows look softer on the skin.Video Here
Experimenting with the Opacity (the amount of transparency) and the Flow (how much "paint" comes out) can help in areas that require subtle changes in value. This may vary depending on the amount of pressure you put down on your pen, stylistic choices, and how you prefer to draw.

Step 2 Coloring Here
When rendering hair, I like to think about the direction it lies, flows, or moves. The direction of your strokes makes a big difference; haphazard lines will look chaotic. I recommend taking your time and creating strokes that go from the crown to the tips.

Step 3 Coloring Here
I also like to add variation in the hair, so it doesn't necessarily look like one uniform block. I experimented with placing stray strands on top, in a new layer, in a similar color. To unify them with the rest of the hair, I added contours in a dark color on the outermost edges.Video Here
Step 4 Coloring Here
To achieve more than one color in the hair, I created a New Layer on top of the hair. I used a Clipping Mask, once again, so I don't have to worry about coloring "outside of the lines". I changed the Blending Mode to Color, and voila! Now the tips are blue!Video Here
4. How to Add Texture in the Tail Coloring Here
Step 1Video Here
Usually, a mermaid's tail differs from human skin. We might expect this part of the mermaid to have a scale-like texture, like we'd see on a fish. Before I start to experiment with textures, however, I want to go through and blend the shadows I've placed in this area, using a Soft Round Brush and lowered Opacity.Once you're happy with your base shadows here, it's time to start experimenting with texture. We're going to create a texture ourselves, here in Photoshop, to create a scale-like effect.Video Here

Step 2 Coloring Here
First, much like how we changed the hair color, we'll start by creating a New Layer on top of our artwork. Block out the area in a single color, but don't change any blending modes this time (just leave it Normal for now).Video HereHowever, you will need to Lock Transparent Pixels, as seen below. Coloring Here
This means that when we move on to apply filters, it will stay isolated in this area we've filled in.

Step 3Video Here
First, we'll apply the filter Clouds to create some variation in value. Alternatively, you could add your own variations here, by hand.Video HereWhen using the Clouds filter, make sure your Foreground and Background Colors have been properly selected. In this example, and for this tutorial, I used a light blue and white. Then, with the correct layer selected, go to Filters > Render > Clouds. Coloring Here

Step 4 Coloring Here
Now, let's create some scales! Open up the Filter Gallery, via Filters > Filter Gallery.Then, we'll apply two filters here to our layer: first, Stained Glass, and second, Plastic Wrap. Here is an example of what this looks like, with the Filter Gallery open:Video Here
Take note that the arrow is pointing to the list of applied filters. You can add or delete filters via the New and Trash icons, circled above.
My settings were:
- Stained Glass: Cell Size 28, Border Thickness 7, Light Intensity 4
- Plastic Wrap: Highlight Strength 13, Detail 12, Smoothness 5Video Here
Select OK once you're happy with the values you've selected. Coloring Here

Step 5 Coloring Here
Now, set the Blending Mode of the layer we've been working on to Multiply. Voila! Our mermaid's tail looks as if it's covered in scales.Video Here
5. How to Add the Finishing Touches
Step 1 Coloring Here
To finish up our illustration, we'll add some details to the tail fin and the character's skin.First, cut the mermaid's tail and paste it onto its own layer.
Set the Blending Mode of this layer to Multiply, and lower the Opacity to a value around 50%, as shown above. This will make the tail look transparent. Video Here

Step 2 Coloring Here
To add some color variation to the tail, duplicate the tail layer and change its Blending Mode to Normal. I lowered the Opacity to 33%, and, with the pixels locked (Lock Transparent Pixels in the Layers panel, a technique used earlier in this tutorial), I applied some blues and purples.Video Here
Step 3 Coloring Here
To finalize the tail, I used more than one layer. I drew the lightly colored tips of the tail with a Hard Round Brush with the Opacity all the way up (100%, meaning it is not transparent). Remember, you can always toggle Lock Transparent Pixels on and off, if you'd like to apply color without it going outside the boundary of your drawing. I used this, here, to change the color of this line from purple to blue.Then, to unify and refine the tail, I drew a dark outline around the perimeter of the work I completed in this area (similar to the techniques used in the hair). Coloring Here

Step 4 Coloring Here
Finally, I wanted to add some details to the skin. To do so, I reused concepts introduced earlier in this tutorial. For example, I created a New Layer and created line work on the skin for her skin details and tattoos. I lowered the Opacity on these layers and used a Soft Round Brush when erasing, to smooth and blend the edges.
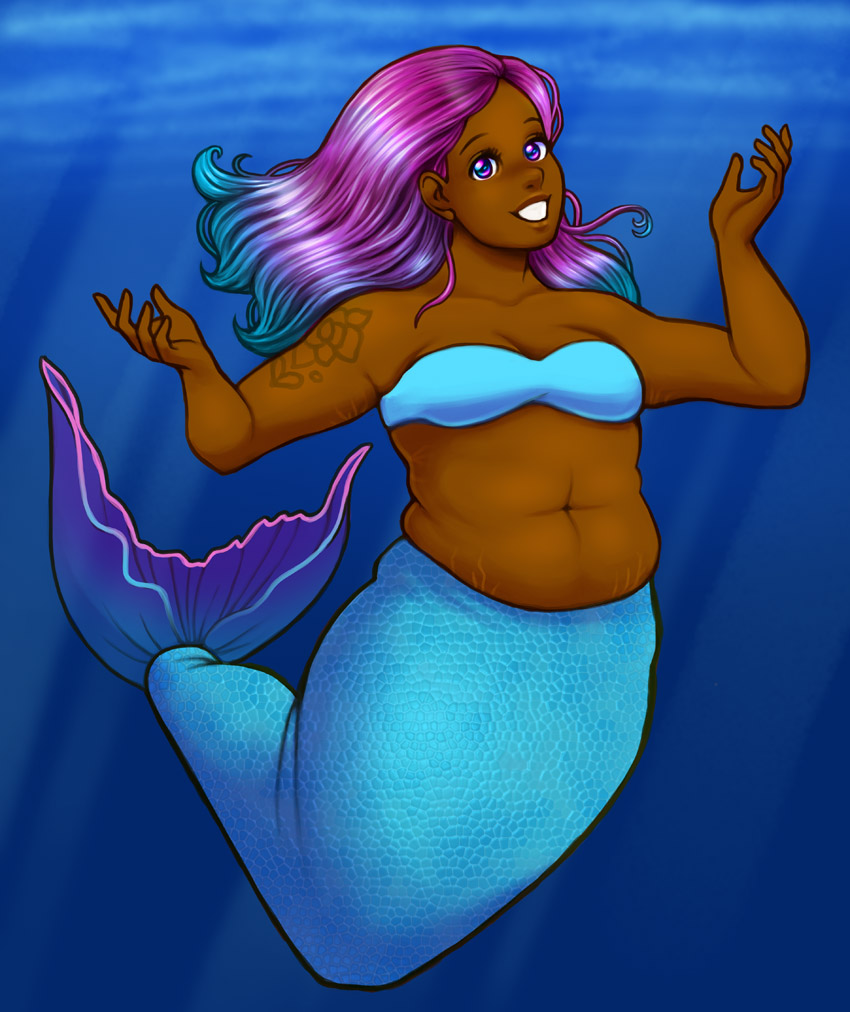
Awesome Work! Coloring Here
I hope you've picked up some new tips and techniques in this tutorial. Please keep in mind that these steps can (and should!) be experimented with—try different colors! Try different poses, body types, and even different types of tails!Good luck creating colorful mermaids of your own! Video Here

Nhận xét
Đăng nhận xét